Dry Hydrant-Flush Kit Installation Checklist
GENERAL DESCRIPTION OF FLUSH KIT:
The Dry Hydrant Flush Kit allows installation of a Dry Hydrant below ground level. This type of installation eliminates any environmental or vandalism concerns which one may have. The flush mount kit includes a molded polymer enclosure with a lockable lid, a quick connect male adapter with cover cap, and a 6"x12" highly reflective decal attached to the lid.
The flush mount system requires a flexible suction hose with female cam lever connections or a hard suction hose adapter for ease of connection with NST couplings. This adapter may be purchased separate if required.
The Flush Kit is used with the standard 6" Dry Hydrant by utilizing either the straight or 45 degree intake assembly. This arrangement assures full flow & straining capability thru both the underwater strainer and our secondary conical strainer. The quick connect suction hose adapter is available in a 3", 4", 5", and 6" cam lever connection.

Any pond, stream, or buried underground tank may be used as a water source. Swimming Pools can also be plumbed into Dry Hydrants for use. To put these sources in perspective, a one acre pond roughly 1 inch deep is equivalent to 30,000 gallons of water. This is equal to the required 250 gal/min 2 hr. flow, established by ISO for "Water Supply" in a Class 8 or lower rating.
In selecting your Water Source one should first be sure it is adequate during drought conditions. These requirements may be found in the (ISO) Insurance Services Office "Fire Suppression Rating Schedule", or equivalent Insurance Regulations used by those states not covered by ISO. A point 2 feet below the drought level should be adequate for determining the horizontal lay of the pipe.
VERTICAL LIFT:
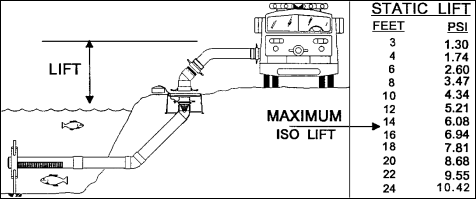
While lifts of 22 ft. may be obtained under ideal conditions, it is not recommended installations exceed 15 feet. Pumps other than Class A should avoid installations which exceed 10 feet. Vertical lift may be determined by measuring the distance from the waters surface to the inlet of the pump as noted in the above diagram.

ACCESSIBILITY & COORDINATION:
Hydrants should be located to provide an immediate water supply in an emergency situation. Because of this several considerations regarding location and accessibility must be met.
- Access suitable for all weather conditions.
- Sustained maximum grade of 8 percent.
- Road width should be at least 12 feet.
- Site should have proper drainage.
- Provide proper erosion control, especially after construction.
- Locate hydrant near homes or structures if possible.
- Must be able to get permission & permits as necessary.
Permission of the land owner is needed before a Dry Hydrant site survey can be conducted. It is best if someone known by the land owner ask about doing a survey before trespassing on ones land. He should explain the benefits, and stress the pond will not be "Sucked Dry" by the fire department.
Upon site selection written permission should be obtained. Sites on certain waterways and governmental properties may require special excavation and environmental permits. All permits must be cleared prior to excavation. Cutting of trees, landscaping and etc., should be discussed with the land owner and put in writing.
Coordination with local fire departments and property owners should be made clear, and also be included in the signed agreement. This will clarify issues such as insurance, usage of water supply, and notification to local fire departments prior to draining of the pond.
Land owners installing Dry Hydrants should consult local fire departments on hardware sizing, hydrant location, and other requirements for obtaining lower insurance rates. Local departments should have approval procedures, an inspection procedure, and hydrant cards established for semi-annual maintenance.
WATER SOURCE EVALUATION:
Upon selection of a location the water source must be evaluated to assure it's ongoing availability. Several points should be considered:
- Condition of the pond dam - Is it strong? Does it leak?
- Does the landowner have future plans for the pond?
- Distance of hydrant to pond.
- Static lift.
- Depth of water at the supply intersection.
- What is the watershed to pond ratio?
- Is weed control a problem?
- What are the soil conditions? Clay or sandy?
- Are spillways adequate for high overflow conditions?
- Does water levels meet 50 year drought conditions?
- Is the pond of sufficient size?
If answers to these questions are positive then the water source should be adequate for installation of a Dry Hydrant supporting fire suppression.
INSTALLATION:
- Installation should be done in accordance to detailed plans, and maps showing water shed, and a 50 year drought condition. This can usually be obtained thru local fire departments, the Soil Conservation Department, or a state certified engineer.
- A back hoe should be used to dig a level trench below the waters surface. A cleaner trench is obtained when digging is started out in the pond and proceeds back to the intended hydrant location. The trench should be approximately 2 ft. below drought level. A slight slope of 1-3 degrees can be used, but all horizontal piping should be below the pond drought level.
-
Assemble the underwater strainer to the horizontal lay of pipe. Next assemble the vertical section of pipe making sure ample length is available for final trimming. MAKE SURE STRAINER HOLES ARE ALIGNED WITH VERTICAL RISER before gluing in place. Allow assembled pipe to set. Slide pipe over into the trench starting on the strainer end. This end will usually float, allowing ample time to make minor adjustments for exact placement. Care should be exercised to prevent stress on glued couplings or joints, when lifting and lowering into the trench.
Make sure to use 6", Schedule-40 PVC pipe and fittings. Avoid using pipe which may have been exposed to direct sunlight for long periods of time, as it may have become brittle.
In cutting the PVC pipe us a medium tooth saw (a carpenters hand saw works well). Never use a chain saw, as the PVC curls left in the plumbing may become lodged in your pump housing during initial pumping and testing of the installation. This is especially true on small 2 1/2" portable pumps.
If an underwater support is required, remove the two (2) plugs from the strainer. Insert a 1" outside diameter pipe thru the first hole of the clamp band. After inserting the 1" pipe or rod thru both walls of the 6" Dry Hydrant pipe, bend the clamp band around the PVC pipe until the other hole in the clamp band is in position. Continue to extend the 1" pipe until sufficient length is reached. Drive the 1" pipe into the bottom of the pond using a pipe driver, or metal fence post driver. Once the support is in place, position the strainer so the pipe is at rest in the bottom of the trench. For more detailed instructions see "Strainer Installation Instructions", included with this product.
Back-fill the trench, starting at the Dry Hydrant end and proceeding toward the water's edge. For convenience it is best if dry dirt is used in the vicinity of the hydrant head, as the head and below ground box must still be installed. An area 2 ft. x 2 ft. should be left open in the trench near the vertical riser. Position the Dry Hydrant head assembly approximately 3' below the ground surface. A 2x4" board is ideal for spanning the open trench to determine this elevation. Saw off the excess vertical pipe length and bond the head assembly in place. Care should be taken to properly align this assembly. CAUTION: For adequate clearance inside the hydrant box make sure all quick connect adapters and caps, are assembled and checked for below ground height prior to gluing the head assembly in place.
Position the flush mount box to accommodate the cam lever handles of the flexible hose or hose adapter. Vertical placement can be adjusted by slowly applying gravel in the bottom of the trench under the box. This also acts as a drain for water that may collect in the box during rainy weather or use. If the installation is in a low area subject to standing water, a drain pipe may be laid along side the 6" pipe, back to the pond. This pipe can be as small as 1/2" diameter, but should have sufficient wall strength to prevent collapsing. See diagram below:
In positioning the box raise the box top 1-2" higher than ground level. This will allow for settling & prevent a low spot which would hold water during rains.
After the area has dried to permit leveling, landscape or sow grass seed to restore the area back to its natural appearance. Hay or straw will serve to prevent erosion until vegetation is present.
- Install proper signs etc. to identify the water source.

DESIGN INFORMATION:
- To assure maximum flow it is best if installations are kept as short as possible. We recommend all installations be designed for a minimum of 1,000 GPM. As noted previous all horizontal pipe should be below water level. Long "Dry Pipe", will cause primer pump failure!
- Hydrants should be installed in deep water rather than the shallow end of a pond. This is necessary due to the reach of a back hoe. On a shallow slope, the reach would exceed the 10 - 12 ft. reach capability of most equipment.
- Both a 45 degree or 90 degree configuration
can be used to install the dry hydrant. One may be a better choice
than the other depending upon terrain, site location, length,
and lift to the hydrant head.


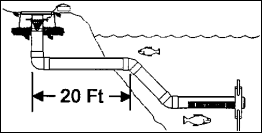
- On short pipe installations of approximately 20 ft., a slight variation can be made to significantly add of the draw-down depth during drought conditions. This type of installation may also be used on very small, but deep ponds where draw-down of the water level may be significant. This design may also be used on short installations, where rock prevents normal trenching used in allowing the horizontal pipe to rest below water level.
